
Basics Simplified
Dampers (or shock absorbers) can be broken down into two simple movements compression and rebound. Compression often referred to as bump, is when the damper is compressed, such as when hitting an apex curb. Rebound is the opposite and is when the damper extends.
Put simply, adjustable dampers change how stiff or soft the dampers are. Increasing damping increases resistance and makes it stiffer/harder to compress or extend. Softer damping is when there’s lower resistance, allowing the damper to compress or extend easily. A stiff damper moves slowly, and a soft damper moves quickly.
Weight Transfer – A Core of Vehicle Dynamics
Applying these principles, we can manipulate weight transfer of the sprung mass “vehicle body”. The suspension compresses under two cases: when a bump in the road is hit ‘high-speed’ and underbody roll ‘low-speed’.
For example, imagine racing down a straight and hitting the brakes before a corner. The vehicle’s weight is transferred forward and the front suspension compresses: ‘compression’. This reduces the weight on the rear suspension causing it to extend: ‘rebound’. As you turn into the corner the weight transfers to the outside wheel and the body roll, compressing the outside suspension in “low-speed compress” and extending the inside suspension in “low-speed rebound”. Your on the racing line and hit the apex curb. The bump from the apex curb causes the suspension to compress “high-speed compress”.
Now can you guess what condition is introduced, As you get back on the power on corner exit?
Yes, low speed from weight transfers to the rear as power is applied aka squats.
Using the damper adjuster, you can control stiffness affecting weight transfer. A stiffer damper that is hard to compress or extend changes the rate of the weight transfer.
**Note you can’t reduce or increase weight transfers, it always going to happen but you can control the rate “speed” it transfers.
CHECK INFO
A soft damper will increase weight transfers.
Controlling weight transfer will allow you to apply more force to the tyres which will increase grip. By increasing tyre grip it allows you to corner at higher speeds, reducing lap times and improving cornering performance.
Corners – Where Are You Losing Time?
When improving handling, the best method is to split the corner into three sections: Corner Entry, Mid-Corner and Corner Exit. This will enable us to examine what’s happening and where we can improve.
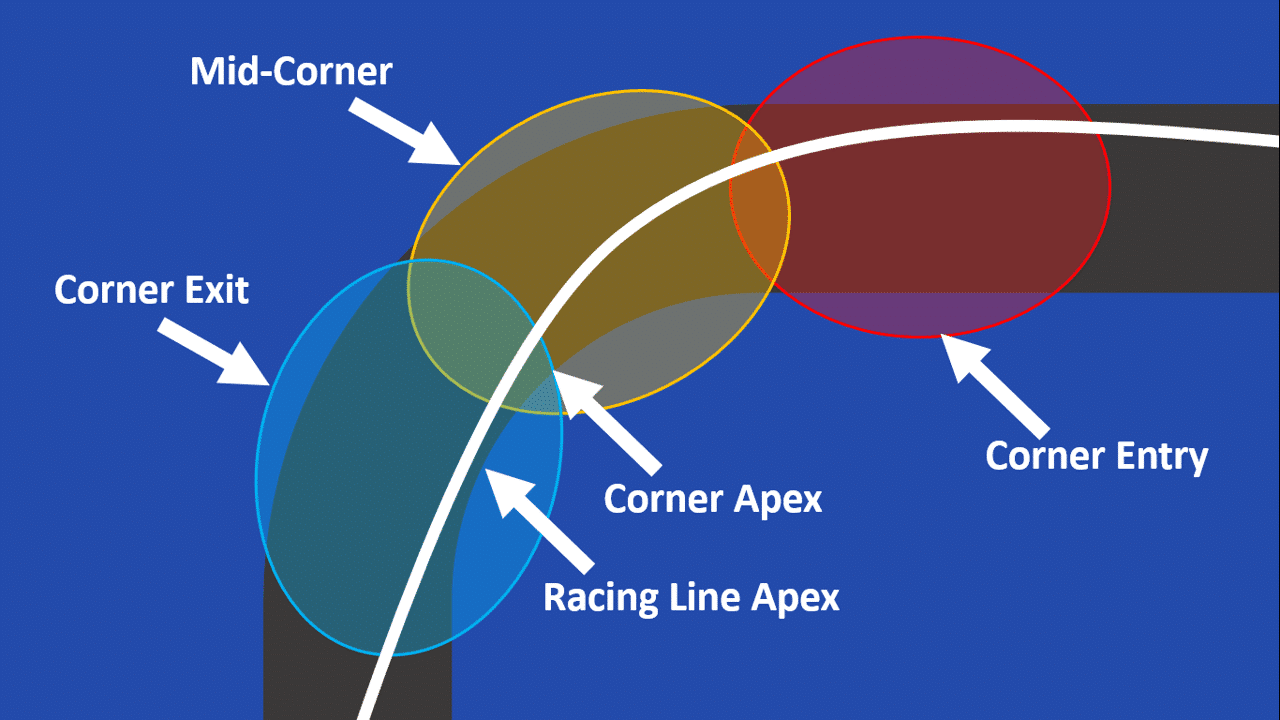
Corner Entry – is the transition from s – this beginning of a corner where the driver transitions from a straight-line hard braking zone, to trail braking and initiates turn in by adding steering angle. Weight transfer to the front axle is high due to the braking forces, this is often called ‘dive’.
Mid-Corner – is the centre segment where the maximum steering input occurs, the tyre is exposed to high lateral loads. Any trail-braking pressure is low then transitions to feeding the throttle. Load on the front axle is reduced as weight shifts towards the rear. The mid-corner point should not be confused with the racing line apex, this will be later in the corner where steering input is reduced.
Corner Exit – steering input is reducing as the driver clips the apex and starts to apply the throttle as the car straightens up. Weight transfers to the rear as acceleration force is applied. This is referred to as ‘squat’.
The car can take the corner faster and faster until it reaches the limit of the tyre grip. At this point the car will lose traction and it will understeer or oversteer.
- Understeer is the loss of grip on the front tyres causing the car to push on in a straight line instead of turning.
- Oversteer is a loss of grip to the rear tyres and the rear of the vehicle rotates around towards the front.
Reducing these conditions to maximising grip, increase cornering performance and inspires driver confidence.
Note: for advanced drivers, a small amount of oversteer on the corner entry can be used to rotate the car around the corner by reducing steering input. This allows the driver to exit the corner straighter and apply the throttle earlier.
Trackside Tips!
We have found that by using the adjustable damper settings and applying our knowledge of vehicle handling and the corner, that we need to increase tyre grip by controlling the weight transfer! The following will guide you to tune suspension setup for any track and driving condition giving you better handling.
Corner Entry Understeer
- Usually understeer is a result of too stiff front compression. Softer compression damping allows for more weight transfer to the front axle. Soften the compression too much and the front will feel under-supported, then go back to the pits and stiffen a couple of clicks.
- Occasionally, too stiff rear rebound will prevent weight transfer to the front axle. This can create an understeer condition
Corner Entry Oversteer
- Stiffening rear rebound will reduce weight transfer to the front too quickly. By slowing the rate of weight transfer this will retain more weight on the rear, generating more rear grip and reducing corner entry oversteer.
NOTE: You don’t want to take grip away from the front if you don’t have to because the front tyres do a lot of the braking and steering so reducing their grip reduces their ability to do this.
Mid Corner Oversteer
- Increase/stiffen rear rebound. If mid-corner oversteer occurs when lifting off the throttle.
- Reduce/soften rear rebound. If mid-corner oversteer occurs when increasing throttle.
Corner Exit Understeer
- Stiffen front rebound. To keep weight on the front tyres for longer – increasing grip.
- Stiffen rear compression. This will balance the chassis by reducing rear grip.
Corner Exit Oversteer
- Soften rear compression. This allows faster weight transfer to the rear tyres, increasing rear grip.
- Soften front rebound. This also allows faster weight transfer to the rear tyres, increasing rear grip
Ride Quality Tuning
Tuning for the ride quality is not only for comfortable cursing on road but applies getting suspension compliance from a rally car of a rough forest stage. a winding tarmac road through the valley, even a sprints car ready to take on a hill climb. a well-tuned compline suspension will all the vehicle to travel across bumps without jarring the driver while maintaining inspiring handling cataracts.
Too Stiff
If the suspension is not compliant over an uneven surface (too stiff) this causes the car to feel unsteeled causing two problems. 1. the tyre repeated brakes traction with the ground as it’s skipping from bump to bump evidently reducing traction and controllability. 2 the ride is harsh and jarring causing an uncountable ride. both of these effects compound to reduce driver confidence as their constantly as they have to fight twitchy car darting all over the road, while fighting to sit upright while being bouned around the cockpit of the car.
Too Soft
if the suspension is too soft it will be very comfortable over bumps but under braking, acceleration and cornering the cars body wallow around like a bobbing boat on the open sea. If the driver is using the steering wheel to support themselves while getting thrown around a wallowing car this obviously reduce driver control
Compress Damping
- Suspension bottom out too easily on kerb strikes and large bumps increase compression damping
- The car is unsettled by small bump, and feels harsh and reduced compression damping.
- Off-road or rally application the suspension rarely bottoms out on big hits and drop-off, softening compression.
Rebound Damping
- The suspension tops out too aggressive, an example of this would be as soon as you step on the throttle the front of the car flys up or as soon as brake is applied the rear shoots up uncomfortably. Increase rebound at the axle that it’s topping out too aggressively.
- After a bump the vehicle body (sprung mass) continues to bounce and oscillate, increasing rebound damping
- The suspension feels harsh and crashy- reduce rebound damping
Adjustable Suspension Variations- what’s the difference
There are many variations to control adjustable damping, these radiation allow you to stiffen/increase damping or soften/reduce damping with the simple twist or click of an adjuster trackside.
1-Way Adjustable Damping.
This allows the control of compression-only or rebound-only or simultaneously change both rebound and compression. The disadvantage of adjusting both simultaneously is that you will be forced to compromise performance as you are forced to balance the rebound and compression settings.
2-Way Adjustable Damping.
Enables us to have independent control of rebound and compression. This provides us with a good base to tune the suspension set up. Ideal for track enthusiast and clubman level racers looking tune handling for different tracks and weather conditions.
3-Way and 4-Way Adjustable Damping.
Utilities independent control of compression and rebound but with the addition of each of them divided into high speed and low speed. This enables the control of the sprung mass separately from the un-sprung mass.
For example 3-way adjustable ‘low-speed compression, high-speed compression and rebound’ it lacks control of the low-speed rebound in comparison to a 4-way which would have separate high and low-speed for both rebound and compression
5-Way and 6-Way Adjustable Damping.
Has all the control of 3,4-way but with the addition of a blowoff. This is used for very high-speeds resulting from curb strikes or ruts when off-road rallying. This allows the oil to bypass the main valving creating a softer compliant damper to handle the impacts.
How to adjust – don’t lose count of the clicks
Just twist the knob right? No the best advice I can give is to always count the damper settings to a zero reference point and then adjust them to the new settings and write this setting down. The reason to count to zero point it’s reduced the error of miss counting a click. This way you know the exact settings the vehicle was on and where your adjusting to. It’s far too easy to add a click or two here then take one away there and by the end of the day on track you will have lost how and why you got your current setup.
Depending on the brand and design of the adjuster the zero refrance point could be at full soft or full stiff.
When logging damper settings use minus or plus sign (-/+) to denote where you are working from.
If your zero point is at full stiff you will use the minuses notation (-) as with each click you reduce damping making it softer.
The opposite is applied when using full soft as zero point, with each click damping is increased there for a plus is used (+)
Some examples.
A 2-way adjustable damper has 10 clicks of adjustment counting from Full Still compression (COMP -7) rebound ( REB -4) is equal to (COMP +3 REB +6) when working from Full soft
To make things more complicated some will have different zero points per adjuster
A good example of this is the Penske Racing Shock 8760-series used on the BTCC. This is a 3-ways damper that counts low-speed compression and rebound from stiff and high-speed compression from soft. If you paid attention you’ll be able to follow the example setting. at full soft (LSC -28 HSC +0 REB -80) base line settings could be (LSC -9 HSC +12 REB -40) and at full stiff (LSC -0 HSC +17 REB -0)
Note Low-speed compression is marked as LSC and High-speed compression is HSC.
Adjustment Clicks – Not Every Click is Equal!
Not every click is equal! You might think each click on the adjuster changes the damping the same amount, but this is not true. Depending on the adjuster method and type I can affect how linear the range of each click is. also, each click might affect low speed more than high speed, this is something to keep in mind, especially on 1 or 2-way adjustable dampers.
Needle Valve
Needle valve (needle & jet) systems use a bleed bypass method to adjust the damping. A small port/jet and tapered needle attached to the adjuster. When the adjuster is on stiff the needle closes the port stopping oil flow. As the adjuster turned the needle moves, opening the port. The taper on the needle allows for control of the size of the port regulating flow. Reducing the damping depending on the amount of oil allowed to bleed past the main piston.
Depending on the suspension manufacturer tamper style of the needle shapes and ports will vary, even additional components bearing and spring are used to improve constancy and function.
This system tends to provide each click with the same amount of adjustment, however, As this system utilises bleed to bypass to change damping with each click.
The needle and jet valve system is perhaps one of the most commonly used. The best practice it’s to count the click from a full stiff zero point, as the valve is closed.
Preload Shim Stacks
Connected to the adjuster there is a stack of shims, as the damper moves oil is forced through a port causing the shims to crack open allowing oil to flow past. Turning the adjuster stiffer adds preload to the shims stack. By adding preload it increases the force required to crack open the shims increasing damping. At soft there is little to no preload on the shims as the adjuster turns stiffer, preload increase stuffing the damper with each click
The change to the damping rate is linear, affecting high and low-speed damping together linearly. Often with this system, each click is not equal. At full soft, the first few clicks add a small amount of preload, with each click this will scale so the clicks at the full stiff range will add much more preload and damping between them. if you imagine tightening a nut finger tight would be equal to full soft some resistance but the nut will turn with a small amount of force. When the nut is tightened up it takes a large amount of force to move it a fraction. It’s a similar situation for the oil to force the shim stack to crack open.
The zero point for this type of damper is usually at full soft when the shim are at minimum load.
Spring Loaded
As the suspension moves oil is forced to open a spring-loaded valve. This is used to control the damping. Connecting the spring to an adjuster, preload can be added. This is done to effectively change the stiffness of the spring. Increasing preload makes it harder to compress the spring, increasing the amount of force required to open the valve stiffening the damping. in addition to adjusting the spring preload, springs can be changed for softer or stiffer to increase or reduce damping. the type of valve can variety between
The zero point for this type of damper is usually at full soft when the springs are at minimum load.
Port size
The damper/shock absorber fluid is directed to flow along with an oil gallery during compression or extension, particularly blocking the gallery is a circular port/orifice, this is connected to the adjuster. As the adjuster turns it’s will change the port to one with a different diameter. By changing the dimensions of the port it regulates flow providing damping control. Smaller ports restrict flow increasing damper (Stiffer) larger ports increase flow reducing damping. (Softer)
for those of you into classic cars or who remember to them this work on a similar principle to jetting a carburettor. Larger the jet, the more flow.
This damper is simple but offers a small adjustable range. On the adjuster, there is often a small number of clicks marked out denoting the full range of adjustment.
How to apply what we’ve learnt
Hopefully you’ve gained an insight into how adjustable suspensions work to improve your handling and vehicle ride. The understanding of how compression and rebound damping stiffness affect weight transfer and with few twist damping stiffness is adjusted to reduce under/oversteer improve handling and ride. The adjuster damping is one of the many parts to getting the perfect setup. Tyre pressure, anti-rollbar stiffness, wheels alignment etc all play a part in handling and must be considered when adjusting the setup.
If you’ve found this article help check out some of our others to build and expand your tuning knowledge. Then you can bring all the elements together to reduce that lap time and bring out that confidence-inspiring handing.