
Camber Angle -Tuning Wheel Alignment
Camber angle is the angle at which the wheel sits in relation to the vertical axis. The most common of the 3 types of camber is negative camber used to improve cornering grip. learn more about camber and how tune it for your benefit.
- What is camber Angle
- How Does Camber Work
- Camber Gain
- Camber Tuning
- Camber & Tyre Temper
- How to Measure Camber
What is Camber Angle
Camber angle is the angle measured from the wheels centreline in relation to its vertical axis. There are 3 categories for camber angle
Looking from a head-on view of the vehicle, the angle the wheel sits in relation to its vertical axis is the camber angle.
There are three categories for camber angle are.
- Neutral / zero Camber, when the wheel sits at 90 degrees to the ground
- Positive Camber, the top of the wheel will point out away from the vehicle.
- Negative Camber, This is where the bottom of the wheel points out away from the vehicle. This is one of the most important for better handling.
Increasing tyre grip during cornering is most dependent on optimising Camber value. This can reduce understeer and raise corner speed.

How Does Camber Work – Why It’s Useful
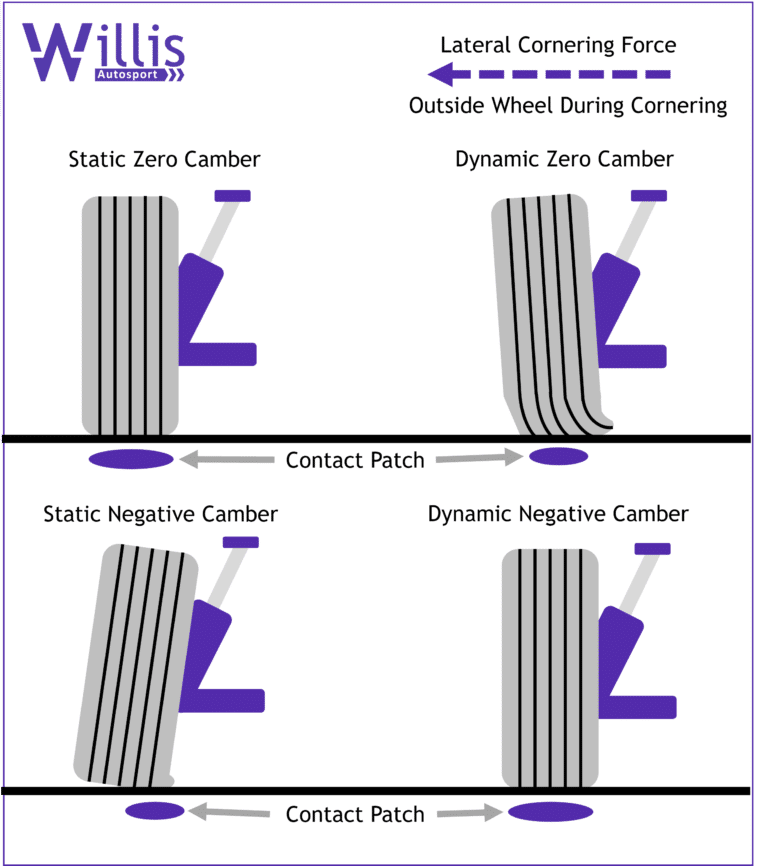
The importance of the camber angle has everything to do with increasing contact between the tyre and ground to improve grip
I’m going to need you to use your imagination to visualize the next bit.
You’re looking at a wheel and tyre rolling down the road in a straight line, standing up vertically. The wheel turns a corner applying a lateral load. As the tyre is flexible this deforms the tyre’s sidewall. The sidewall facing the outside of the corner will roll under the wheel and the inside sidewall will deform; curving upwards as it’s pushed across. This pulls some of the contact patch up with it, trus, reducing its area and grip.
Generally a larger contact patch has more grip. Compare a fire breathing Group B rally beast to is domestic commuter car cousin, and you will see great big wide arches to fit great big wide tires with a larger contact patch.
How do we overcome this reduction in contact patch size during cornering?
Negative camber! But not too much.
Using some negative camber gives the wheel a slight angle. The bottom of the outside edge slightly raised in the static position, however, when driving through a corner the defoliation of the sidewall will actually cause the tire to flatten to the road which maximises the contact patch during cornering. Before the outside sidewall rolled under, but now it’s still raised it deforms to sit vertically. Where the inside sidewall curled up before now it sits vertical during the corner.
Too much negative camber and the angle is so excessive that even when the tyre deforms during coner the outside edge remains raised. It reduces contact patch size and grip. It’s about finding the optimal camber range for a particular car tyre and track.
This is why a tyre pyrometer is used to check tyre temperature. This gives an indication how much of the tyre contact patch is being applied. See the measurements for full details
Now I hear you asking,” what about the tyre on the other side of the car as it will be cambered the opposite way therefore gripping less?”
Well as weight transfers to the outside tyre during the corner. The outside tyre generates most of the lateral girp, so having a setup to optimise the outside tyre function will give us the most gains in cornering performance. Also the inside tyre is going to deform less as there is less load on it.
Ideally you would get both wheels to adjust their angle to suit the corner and caster can be used to somewhat achieve this. Find out more about casters in the next article… coming soon.
You can’t have your cake and eat it too!
YES you guessed right! Increasing negative camber to enhance lateral “cornering” grip came at the cost of longitudinal “straight line”grip.
Now the wheels sits at a slight angle reducing the contact patch when driving in a straight line. Reducing braking and acceleration performance.
Compromise, compromise, compromise.
It’s a balancing act between running zero camber for longitudinal grip and negative camber for lateral grip. The optimum amount of negative camber will vary from track to track as they have a different ratio of corners as straights.
It’s easy to find the optimal camber settings because the tire will tell you.
Check out the how to measure camber section below if you want to skip right to it.
Positive camber is like the unpopular kid at school. But even that kid has two friends.
Oval Racing: Positive camber is only really seen in oval racing on the inside tire for the same reasons we use negative increasing on the outside as mentioned earlier.
On some high power RWD drag, as the launch weight transfers to the rear compressing the suspension. As most IRS (independent rear suspension) gain negative camber in compression (squat) this reduces contact patch size and longitudinal grip. To counter this static positive camber is used. When the weight transfers during a launch the rear suspension compresses to zero camber maximising the contract patch and grip.
On reflection being useful in oval and some drag racing, positive camber must be popular in America! Just unpopular here in Britain where we like to turn left and right.
Camber Gain
As suspensions move often the wheels travel in an ark. Often causes the suspension to increase negative camber in comparison and positive camber in droop. How much camber gained varies from vehicle to vehicle depicted suspensions, geometry and system.
Different suspension systems gain different amounts of camber, comparing McPherson struts to Double Wishbone, (Double A Arm) the extra pivot points double wishbone enables the amount of camber gain to be tuned by changing the length of the arms. Most geometry are designed to increase negative camber with compression. Double wishbone suspension can be designed to have a larger increase to negative camber during compression when compared to struts. As it can gain more camber, less static camber is needed providing better braking performance while maintaining later cornering grip.
So, let’s take a look at the different conditions.
Fly down the straight, you leave it as late as possible before you stamp on the brakes.
-Under heavy braking the car will experience a dive. Weight transfers to the front compressing the front suspension increasing negative camber. Rear suspension extended reducing negative camber.
-On the racing line through the corner, just kiss the apex curb and now feed the throttle as you come flying out the corner.
-Under acceleration the opposite happens weight transfers to the rear causing it to squat compressing the rear suspension. The noses lifts and front suspensions extends
Throw it into the corner hard and the body rolls as your looking to hit that late apex,
During cornering, the outside tyre has the highest load causing that to compress, increasing negative camber, while the inside suspension extends, causing a loss of negative camber.
When setting camber, you must consider how it will affect the vehicle when it’s in motion during driving conditions.
Camber Tuning – Simple As Maximise Grip
Camber is used to maximise tyre grip this makes it simple, as we are working to achieve one outcome.
GET AS MUCH GRIP POSSIBLE.
There are two trick bits to solve this problem.
- Balance between lateral and longitudinal.
The amount of camber is a compromise between optimising the tire contact patch for either lateral cornering grip or longitudinal braking and accelerating grip. - Static to dynamic camber
When we set the car up it’s stationary, (not moving) referred to as ‘static camber’; However, when the car’s flying around a track, getting thrown into a corner, there are forces acting upon the car, this deformation of the tire previously mentioned and movement of the suspensions changes the wheel alignment. We refer to camber when the vehicle is motion as ‘dynamic camber’
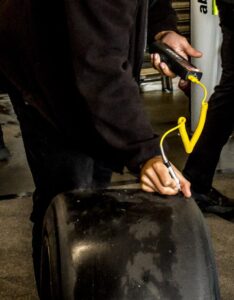
The dynamic camber will change from corner to corner, as we can’t pause time and walk over to the car mid corner and take measurements to see how much of the tire contact patch is being used or rolled over, so we use a tyre pyrometer (tyre temp probe). To use this we take 3 temperature readings across the tyre, starting on inside, middle and outside. This gives us the temperature spread across the tyre. The higher the temperature the more that section of the tyre is being used.
Tyre Temperature Gauge
The tyre pyrometer has a thermometer in the tip of the probe that is pushed into the tread to give a reading of the core temperature.
The probe will take 3 readings across the tyre contact patch, at the inside, middle and outside. This is known as tyre spread.
It’s important to use the probe as soon as the car comes off the track while it’s still hot. The longer it’s left to cool the more inaccurate readings will become.
Looking at the temperature spread, we are after a fairly even reading across all 3 points. If one side of the tyre is drastically hotter and the opposite i’s coolest, This shows part of the tyre rubber is being overworked, getting too hot and so the camber likely needs changing.
Nobody wants an overworked rubber.
Don’t be an idiot and confuse the tyre temperature spread information with the effect of over or under inflation of the tyre.
Temperature Spreads
Too Much Camber – Excessively hot on the inside and coolest on the outside.
Too Little Camber – The outside is the hottest and the inside is the coolest.
Over Inflated Tyre – Centre has the higher temperatures while both outside and inside of the tyre are cooler.
Under Inflated Tyre – both inside and outside know of the tyre has high temperature while centre is lowest temperature.
Tuning For The Track
FWD Set-Up
As all the power comes through the front wheels, running too much negative camber will reduce acceleration. It’s a tough balance between having enough lateral grip for good cornering and longitudinal grip for acceleration and braking.
Rear wheels on FWD setups can run a lot more negative camber.
Honestly the rear wheels are only there to prop the car up and often go through corners as tripods anyway.
Running higher negative camber reduces the contact patch in a straight line reducing drag from the rear wheel which increase speed.
When running on a clock-wise circuit like Brands Hatch, there aren’t many left hand corners. This doesn’t load the right rear tyre much, so it’s often cold. To overcome this running a setup with less camber is used.
RWD Setup
A higher degree of negative camber can be used on the front wheels. It is still about balancing the trade-off between lateral cornering grip and longitudinal braking grip, however, compared to FWD a RWD makes great use of the rear wheel for deceleration.. Allowing us to run more negative camber.
Too much rear camber will compromise corner exit reducing acceleration.
It might be heroic to be the last of the late brakes,however, the guy who comes out the corners fastest wins the race.
Drift Setup
In drifting higher negative static camber on front wheels is used to offset positive camber gain as result of caster geometry at the extreme steering angle used. This causes the lead wheel to be flat with the road maximising contact patch grip while drifting.
Too much static negative camber will reduce straight line grip, for turn in to initiate the drifts, you won’t be able to flick the car in as hard.
For the rear a small amount of camber is needed in comparison to circuit racing. As the cornering forces applied are not perpendicular to the car like normal cornering, drifting forces are applied more of a 45 degree angle “drift angle depend”
Lower rear camber values can also aid in better feel during transition.
How To Measure Camber
Camber Gauge
These gauges come in variety of forms but can be split into two categories: digital or analogue. They are placed flat against the wheels face and measure its angle against the vertical axis to give the camber angle. ( make sure its not touching the tyre )
It is absolutely critical that the vehicle is on a flat level surface to measure camber with these gauges. If the vehicle is at angle when the gauge compares the wheels face to the vertical then won’t account for the vehicle not being level and give a false camber angle reading.
This is why race teams will take a flat floor “flat patch” trackside to do set up and wheels alignment on.
Analogue gauges use a simple spirit level bubble. again marking to denote the camber angle. These are popular as they don’t need calibrating.
Digital will provide a camber angle to .several decimal places giving more accurate and precise reading.
Wheel Alignment Machine
Most road car garages will use a large 4-wheel alignment machine to adjust wheel alignment. These machines are often fitted to 4 post ramps. They attach equipment to each wheel using sensors used to check each wheel camber. Giving a reading on the display screen.
Next Step...
I’m grateful for you taking the time to read all of this. Hopefully, this has given you a new insight into a way to tune your cars your car to drive better.
Have you found reading this useful? For more information, just that has great details I would recommend checking out our other free resources and articles.